Oh My Zsh – Fix my Command Prompt

I do a lot of CLI demos when showing off PSO and K8s and Helm and all the cool things they can do. I made the switch to ZSH and oh my zsh and I really like using it for the past year.

After trying a few different themes and prompts I settled on the following using the “Agnoster” theme for oh-my-zsh. I added the kube-ps1 plugin so I can see what cluster I am using.

Pretty sweet prompt

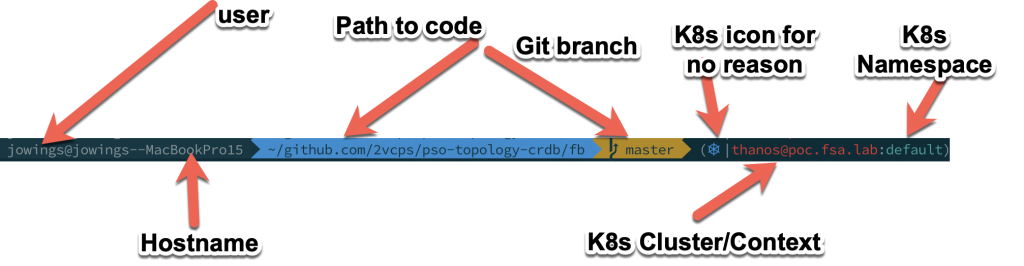
One annoyance is getting when I am in some github repo for a demo deploying containers and ingresses and stuff the prompt gets so long the wordwrap on iTerm window makes me crazy.

I don’t even know what I am typing anymore

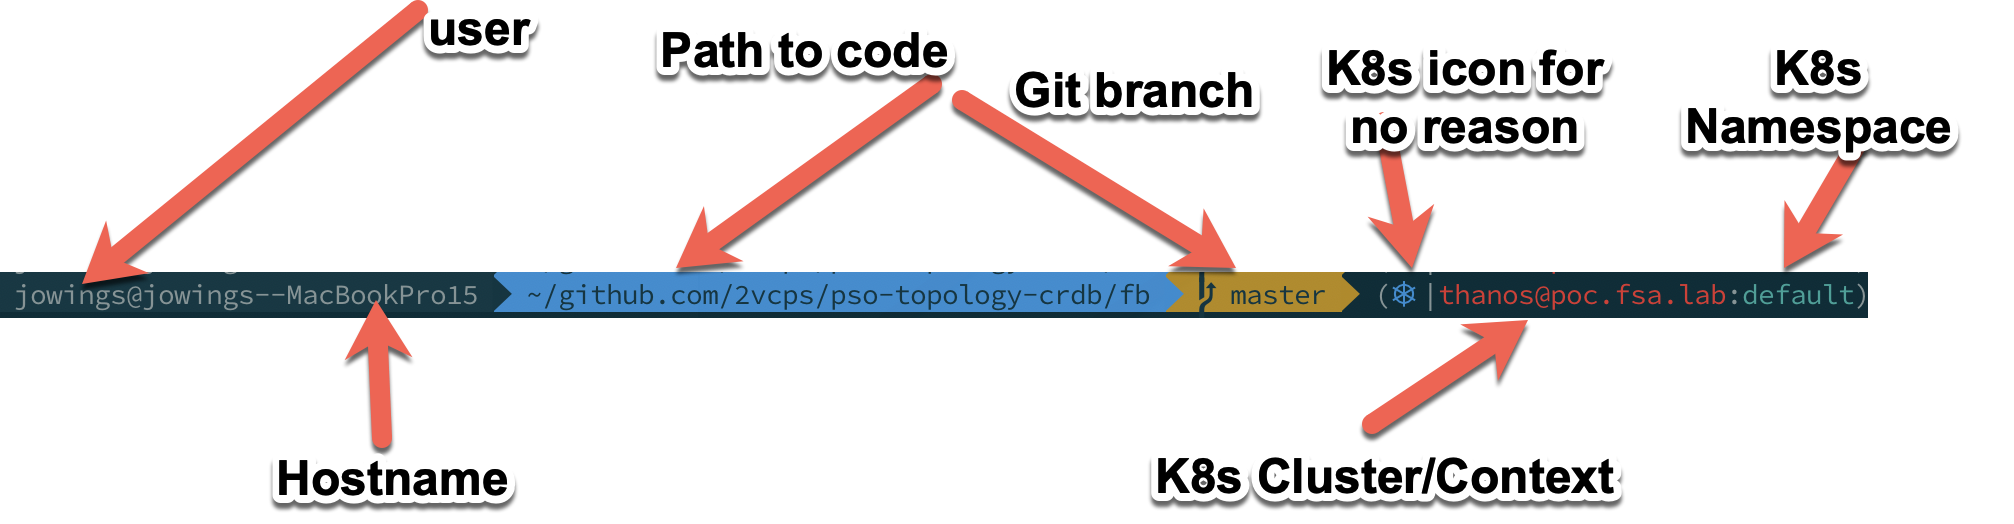
Break down of my full prompt

  • User name – good to know, I have cloud instances that are ‘ubuntu’ or ‘ec2-user’ so this helps me know what I am working on.
  • Hostname – I can shorten this, but there is a jamf policy on this machine that sets it back to this monstrosity. I mean, really who forces the username into the hostname?
  • Path to code – Do I need to see this full path all the time? Probably not.
  • Git Branch – Good to know when I am coding.
  • K8s Icon – Non-negotiable. It is awesome.
  • K8s Cluster/Context – I currently am testing 9 versions of K8s and different clusters. This keeps me sane.
  • K8s Namespace – This for me is nearly always default since I use kubectl -n <namespace> to do things in namespaces.

I saw someone with a different shell with the cool shorthand path and I felt like that should be an option for my prompt. I like everything else about the agnoster theme. So how can I fix it.

First I found this plugin for ohmyzsh:

https://github.com/ohmyzsh/ohmyzsh/tree/master/plugins/shrink-path

So I enabled it within my .zshrc: below is my plugins and 2 important sections.

plugins=(
        git
        kube-ps1
        vscode
        kubectl
        shrink-path
)

source $ZSH/oh-my-zsh.sh
PROMPT='$(kube_ps1)'$PROMPT

The extra “PROMPT” is to add the kubernetes information to the existing prompt generated by the above ‘source oh-my-zsh.sh’

This didn’t magically fix the prompt like I hoped. Somewhere we have to tell the theme how to build the prompt.

If we edit the ~/.oh-my-zsh/themes/agnoster.zsh-theme we actually see the function that builds the prompt.

## Main prompt
build_prompt() {
  RETVAL=$?
  prompt_status
  prompt_virtualenv
  prompt_aws
  prompt_context
  prompt_dir
  prompt_git
  prompt_bzr
  prompt_hg
  prompt_end
}

PROMPT='%{%f%b%k%}$(build_prompt) '

Of course it is a function that calls a bunch of others and “prompt_dir” is the one we want to edit.

Change it from this:

prompt_dir() {
  prompt_segment blue $CURRENT_FG '%~'
}

To this:

prompt_dir() {
  SHORT=$(shrink_path -f)
  prompt_segment blue $CURRENT_FG $SHORT
   }

Now we are using “shrink_path -f” to shorten the directories in the path and storing it in the SHORT variable. Then displaying it in the same spot as full path was before.

Look at how that path was shortened! So far this is working for me on:

  • Windows 10 WSL2 – Ubuntu 18.04
  • Linux Server with Ubuntu 16.04 and 18.04
  • Mac OSX Mojave

Some Reality for us Infrastructure Peeps or Apps are cool too

Don’t’ you just love double titles?

For many years I have been an infrastructure guy. I really liked how the cables, and processors and Memory and blinking lights worked. Applications were often the necessary evil tolerated so that I can play with cool technology. During my own journey toward learning about the cloud it becomes increasingly important to consider the function of the application. Six years ago me would totally punch me in the face right now. Traitor. J

1 – Don’t get your App messed up in my resource buckets of awesomeness


So the reality check to the Infrastructure geek in me is this: The application teams really think of what you do as the network. That is why when anything is ever wrong it is always “the network’s” fault. What we love to do is getting abstracted more and more. I will still contend that is very important and very hard to do. Whether you are building reference architectures or deploying a converged infrastructure appliance almost no one but us cares. They just want the data to do their jobs. So while we have really great discussions about speeds and feeds, the guy in the picture below just wants the app. From the hypervisor down we need to design with the application in mind or we will risk becoming like that goth dude locked in the server room on IT Crowd.


2 Honey badger don’t care about FCoE

My next post will get into what I have been researching regarding what is out there and hopefully help us (infra. peeps) understand our App/Dev brothers better.

You are probably an Infrastructure person if:

  1. You read this blog.
  2. You work mainly with Virtualization
  3. Storage Admin
  4. Network Admin
  5. You like to make fun of DBA’s


Rescan All Hba’s Where are you?

So I was updating some of my blog posts on the esxcfg-* commands with any changes in ESX 4. I wrote earlier I did not know much about the esxcfg-advcfg command. Since writing that post at the end of 2008, I found Duncan Epping used esxcfg-advcfg in 3.5 to set the option rescan all the Hba’s. I thought this was a great shortcut and decided to try it out in vSphere but:

[root@esx4 ~]# esxcfg-advcfg -s 1 /Scsi/ScsiRescanAllHbas
Exception occured: Unable to find option ScsiRescanAllHbas

So I looked through vCenter 4 and did not find the option under Scsi I looked around some in the other Advanced Options and it is no where to be found.

Has this been removed or moved somewhere else? If you know hit me up on twitter @2vcps

Change Service Console IP

Want to change the Service Console IP address from the command line real quick like?

esxcfg-vswif -i [new IP] -n [netmask] [vswif]
example (as root)
esxcfg-vswif -i 172.25.100.92 -n 255.255.255.0 vswif0

Q: How do I know what is my vswif?
A: esxcfg-vswif -l
output

you can also use esxcfg-vswif -l to verify the ip of your service console.

A good reference is also available here.

The watch command in the Service Console

UPDATE: Eric Siebert wrote an almost identical article here for techtarget. Since I don’t want people to think I just lift ideas from other blogs I would like to credit this article at the top. Although I have been using this procedure for nearly 2 years for snapshots. I would like to say I didn’t see his article before I posted mine. Next time I will do more googling. I try to keep this blog from regurgitating ideas that can be found elsewhere.

Do you ever have to commit gigantic snapshots that the vCenter client times out before it is finished. After the initial panic a while ago I learned the snapshots continue to delete even if the client times out. So how do you know what they are finished?
Answer ssh in the service console and look.

A ‘ls’ of a normal virtual machine:

A ‘ls’ of the vm with a snapshot:

Now a try – watch -n 30 ‘ls -alh’
This will re-run the ls -alh command every 30 seconds.
In action:

Now if you VI Client times out you can leave this window running so you will know the snapshots are gone when the vmdk with the “delta” in the filename are gone.

Notice the additional delta files that appear. When deleting snapshots the vCenter will create a new delta file for changes that occur during the delete of the original delta. Then it deletes this new delta. I know I know an awesome video. I really like playing with Jing though.
The watch command can be used with an linux command you want to repeat over and over and over.

ESX Commands – esxcfg-auth

Following my alphabetical method of learning.

esxcfg-auth
usage: esxcfg-auth [options]

options:
–enablemd5 Enable MD5 password storage
–disablemd5 Disable MD5 password storage
–enableshadow Enable Shadow password storage
–disableshadow Disable Shadow password storage
–enablenis Enable NIS Authentication
–disablenis Disable NIS Authentication
–nisdomain=domain Set the NIS domain
–nisserver=server Set the NIS server
–enableldap Enable LDAP User Management
–disableldap Disable LDAP User Management
–enableldapauth Enable LDAP Authentication
–disableldapauth Disable LDAP Authentication
–ldapserver=server Set the LDAP Server
–ldapbasedn=basedn Set the base DN for the LDAP server
–enableldaptls Enable TLS connections for LDAP
–disableldaptls Disable TLS connections for LDAP
–enablekrb5 Enable Kererbos Authentication
–disablekrb5 Disable Kererbos Authentication
–krb5realm=domain Set the Kerberos Realm
–krb5kdc=server Set the Kebreros Key Distribution Center
–krb5adminserver=server
Set the Kerberos Admin Server
–enablead Enable Active Directory Authentication
–disablead Disable Active Directory Authentication
–addomain=domain Set the Active Directory Domain
–addc=server Set the Active Directory Domain Controller
–usepamqc=values Enable the pam_passwdqc module
–usecrack=values Enable the pam_cracklib module
–enablecache Enables caching of login credentials
–disablecache Disables caching of login credentials
–passmaxdays=days Set the maximum number of days a password remains valid.
–passmindays=days Set the minimum number of days a password remains valid.
–passwarnage=days Set the number of days a warning is given before a
password expires.
–maxfailedlogins=count
Sets the maximum number of login failures before the
account is locked out, setting to 0 will disable this
-p, –probe Print the settings to the console
-v, –verbose Enable verbose logging
-h, –help show this help message and exit

For more actual usage I would defer to one of the most useful vm blogs around from Scott Lowe. The common usage for most of us daily users would be to enable active directory authentication on the ESX. So your team of admins can get in and do work in certain situations. Now when your team is one (still looking for that other VCP, hopefully he passes the test this week) or two this is not a huge requirement.
Additional authentication requirements can be set here depending on your environments reqs. I would generally let clients know this is available but have not had anyone demand to have the maxfailedlogsin set to 5 or something.