Category: Containers
Setting up Portworx on a Tanzu Kubernetes Grid aka TKG Cluster

First, this process works today on clusters made with the TKG tool that does not use the embedded management cluster. For clarity I call those clusters TKC or TKC Guest Clusters. The run as VM’s. You just can’t add block devices outside of the Cloud Native Storage (VMware’s CSI Driver). At least I couldn’t.
Now TKG deploys using a Photon 3.0 template. When I wrote this blog and recorded the demo the current latest version is TKG 1.2.1 and the k8s template is 1.19.3-vmware.
Check the release notes here: https://docs.portworx.com/reference/release-notes/portworx/#improvements-4
First generate base64 encoded versions of your user and password to vCenter.
# Update the following items in the Secret template below to match your environment:

VSPHERE_USER: Use output of printf <vcenter-server-user> | base64
VSPHERE_PASSWORD: Use output of printf <vcenter-server-password> | base64
The vsphere-secret.yaml save this to a file with your own user and password to vCenter (from above).
apiVersion: v1
kind: Secret
metadata:
  name: px-vsphere-secret
  namespace: kube-system
type: Opaque
data:
  VSPHERE_USER: YWRtaW5pc3RyYXRvckB2c3BoZXJlLmxvY2Fs
  VSPHERE_PASSWORD: cHgxLjMuMEZUVw==
kubectl apply the above spec after you update the above template with your user and password.
Follow these steps:
# create a new TKG cluster
tkg create cluster tkg-portworx-cluster -p dev -w 3 --vsphere-controlplane-endpoint-ip 10.21.x.x

# Get the credentials for your config
tkg get credentials tkg-portworx-cluster

# Apply the secret and the operator for Portworx
kubectl apply -f vsphere-secret.yaml
kubectl apply -f 'https://install.portworx.com/2.6?comp=pxoperator'

#generate your spec first, you get this from generating a spec at https://central.portworx.com
kubectl apply -f tkg-px.yaml

# Wait till it all comes up.
watch kubectl get pod -n kube-system

# Check pxctl status
PX_POD=$(kubectl get pods -l name=portworx -n kube-system -o jsonpath='{.items[0].metadata.name}')
kubectl exec $PX_POD -n kube-system -- /opt/pwx/bin/pxctl status
You can now create your own or use the premade storageClass
kubectl get sc
NAME                             PROVISIONER                     RECLAIMPOLICY   VOLUMEBINDINGMODE   ALLOWVOLUMEEXPANSION   AGE
default (default)                csi.vsphere.vmware.com          Delete          Immediate           false                  7h50m
px-db                            kubernetes.io/portworx-volume   Delete          Immediate           false                  7h44m
px-db-cloud-snapshot             kubernetes.io/portworx-volume   Delete          Immediate           false                  7h44m
px-db-cloud-snapshot-encrypted   kubernetes.io/portworx-volume   Delete          Immediate           false                  7h44m
px-db-encrypted                  kubernetes.io/portworx-volume   Delete          Immediate           false                  7h44m
px-db-local-snapshot             kubernetes.io/portworx-volume   Delete          Immediate           false                  7h44m
px-db-local-snapshot-encrypted   kubernetes.io/portworx-volume   Delete          Immediate           false                  7h44m
px-replicated                    kubernetes.io/portworx-volume   Delete          Immediate           false                  7h44m
px-replicated-encrypted          kubernetes.io/portworx-volume   Delete          Immediate           false                  7h44m
stork-snapshot-sc                stork-snapshot                  Delete          Immediate           false                  7h44m
Now Deploy Kube-Quake
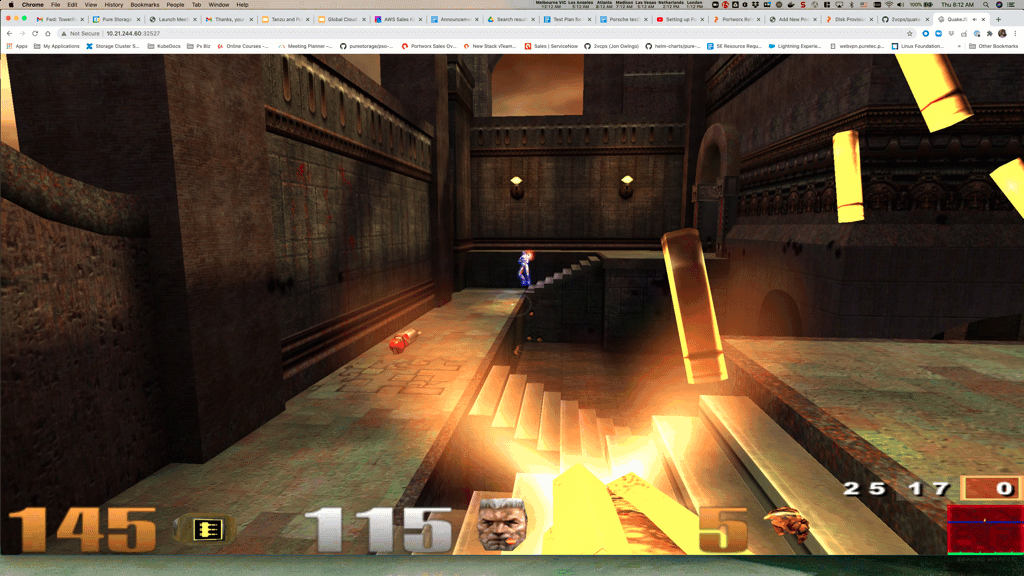
The example.yaml is from my fork of the kube-quake repo on github where I redirected the data to be on a persistent volume.
kubectl apply -f https://raw.githubusercontent.com/2vcps/quake-kube/master/example.yaml
deployment.apps/quakejs created
service/quakejs created
configmap/quake3-server-config created
persistentvolumeclaim/quake3-content created

k get pod
NAME                      READY   STATUS              RESTARTS   AGE
quakejs-668cd866d-6b5sd   0/2     ContainerCreating   0          7s
k get pvc
NAME             STATUS   VOLUME                                     CAPACITY   ACCESS MODES   STORAGECLASS   AGE
quake3-content   Bound    pvc-6c27c329-7562-44ce-8361-08222f9c7dc1   10Gi       RWO            px-db          2m

k get pod
NAME                      READY   STATUS    RESTARTS   AGE
quakejs-668cd866d-6b5sd   2/2     Running   0          2m27s

k get svc
NAME         TYPE           CLUSTER-IP     EXTERNAL-IP   PORT(S)                                         AGE
kubernetes   ClusterIP      100.64.0.1     <none>        443/TCP                                         20h
quakejs      LoadBalancer   100.68.210.0   <pending>     8080:32527/TCP,27960:31138/TCP,9090:30313/TCP   2m47s
Now point your browser to: http://<some node ip>:32527
Or if you have the LoadBalancer up and running go to the http://<Loadbalancer IP>:8080
Ephemeral or Persistent? The Storage Choices for Containers (Part 3)
In this, the final part of a 3-part series, I cover the latest developments in ephemeral storage. Part 1 covered traditional ephemeral storage and Part 2 covered persistent storage.
CSI Ephemeral Storage
With the release of Kubernetes 1.15, there came the ability for CSI drivers that support this feature, the ability to create ephemeral storage for pods using storage provisioned from external storage platforms. Within 1.15 a feature gate needed to be enabled to allow this functionality, but with 1.16 and the beta release of this feature, the feature gate defaulted to true.
Conceptually CSI ephemeral volumes are the same as emptyDir volumes that were discussed above, in that the storage is managed locally on each node and is created together with other local resources after a Pod has been scheduled onto a node. It is required that volume creation has to be unlikely to fail, otherwise, the pod gets stuck at startup.
These types of ephemeral volumes are currently not covered by the storage resource usage limits of a Pod, because that is something that kubelet can only enforce for storage that it manages itself and not something provisioned by a CSI provisioner. Additionally, they do not support any of the advanced features that the CSI driver might provide for persistent volumes, such as snapshots or clones.
To identify if an installed CSI supports ephemeral volumes just run the following command and check supported modes:
# kubectl get csidriver
NAME       ATTACHREQUIRED   PODINFOONMOUNT   MODES                  AGE
pure-csi   true             true             Persistent,Ephemeral   28h
With the release of Pure Service Orchestrator v6.0.4, CSI ephemeral volumes are now supported by both FlashBlade and FlashArray storage.
The following example shows how to create an ephemeral volume that would be included in a pod specification:
 volumes:
  - name: pure-vol
    csi:
      driver: pure-csi
      fsType: xfs
      volumeAttributes:
        backend: block
        size: "2Gi"
This volume is to be 2GiB in size, formatted as xfs and be provided from a FlashArray managed by Pure Service Orchestrator.
Even though these CSI ephemeral volumes are created as real volumes on storage platforms, they are not visible to Kubernetes other than in the description of the pod using them. There are no associated Kubernetes objects and are not persistent volumes and have no associated claims, so these are not visible through the kubectl get pv or kubectl get pvc commands.
When implemented by Pure Storage Orchestrator the name of the actual volume created on either a FlashArray or FlashBlade does not match the PSO naming convention for persistent volumes.
A persistent volume has the naming convention of:
<clusterID>-pvc-<persistent volume uid>
Whereas a CSI ephemeral volumes naming convention is:
<clusterID>-<namespace>-<podname>-<unique numeric identifier>
Generic Ephemeral Storage
For completeness, I thought I would add the next iteration of ephemeral storage that will become available.
With Kubernetes 1.19 the alpha release of Generic Ephemeral Volumes was made available, but you do need to enable a feature gate for this feature to be capable.
These next generation of ephemeral volumes will again be similar to emptyDir volumes but with more flexibility,
It is expected that the typical operations on volumes that are implementing by the driver will be supported, including snapshotting, cloning, resizing, and storage capacity tracking.
Conclusion
I hope this series of posts have been useful and informative.
Storage for Kubernetes has been through many changes over the last few years and this process shows no sign of stopping. More features and functionality are already being discussed in the Storage SIGs and I am excited to see what the future brings to both ephemeral and persistent storage for the containerized world.
Ephemeral or Persistent? The Storage Choices for Containers (Part 2)
In this, the second part of a 3-part series, I cover persistent storage. Part 1 covered traditional ephemeral storage.
Persistent Storage
Persistent storage as the name implies is storage that can maintain the state of the data it holds over the failure and restart of an application, regardless of the worker node on which the application is running. It is also possible with persistent storage to keep the data used or created by an application after the application has been deleted. This is useful if you need to reutilize the data in another application, or as enable the application to restart in the future and still have the latest dataset available. You can also leverage persistent storage to allow for disaster recovery or business continuity copies of the dataset.
StorageClass
A construct in Kubernetes that has to be understood for storage is the StorageClass. A StorageClass provides a way for administrators to describe the “classes” of storage they offer. Different classes might map to quality-of-service levels, or different access rules, or any arbitrary policies determined by the cluster administrators.
Each CSI storage driver will have a unique provisioner that is assigned as an attribute to a storage class and instructs any persistent volumes associated with that storage class to use the named provisioner, or CSI driver when provisioning the underlying volume on the storage platform.
Provisioning
Obtaining persistent storage for a pod is a three-step process:
- Define a PersistentVolume (PV), which is the disk space available for use
- Define a PersistentVolumeClaim (PVC), which claims usage of part or all of the PersistentVolume disk space
- Create a pod that references the PersistentVolumeClaim
In modern-day CSI drivers, the first two steps are usually combined into a single task and this is referred to as dynamic provisioning. Here the PersistentVolumeClaim is 100% if the PersistentVolume and the volume will be formatted with a filesystem on first attachment to a pod.
Manual provisioning can also be used with some CSI drivers to import existing volumes on storage devices into the control of Kubernetes by converting the existing volume into a PersistentVolume. In this case, the existing filesystem on the original volume is kept with all existing data when first mounted to the pod. An extension of this is the ability to import a snapshot of an existing volume, thereby creating a full read-write clone of the source volume the snapshot derived from.
When a PV is created it is assigned a storageClassName attribute and this class name controls many attributes of the PV as mentioned earlier. Note that the storageClassName attribute ensures the use of this volume to only the PVCs that request the equivalent StorageClass. In the case of dynamic provisioning, this is all managed automatically and the application only needs to call the required StorageClass the PVC wants storage from and the volume is created and then bound to a claim.
When the application is complete or is deleted, depending on the way the PV was initially created, the underlying volume construct can either be deleted or retained for use by another application, or a restart of the original application. This is controlled by the reclaimPolicy in the storageClass definition. In dynamic provisioning the normal setting for this is delete, meaning that when the PVC is deleted the associated PV is deleted and the underlying storage volume is also deleted.
By setting the reclaimPolicy to retain this allows for manual reclamation of the PV.
On deletion of the PVC, the associated PV is not deleted and can be reused by another PVC with the same name as the original PVC. This is the only PVC that can access the PV and this concept is used a lot with StatefulSets.
It should be noted that when a PV is retained a subsequent deletion of the PV will result in the underlying storage volume NOT being deleted, so it is essential that a simple way to ensure orphaned volumes do not adversely affect your underlying storage platforms capacity.
At this point, I’d like to mention Pure Service Orchestrator eXplorer which is an Open Source project to provide a single plane of glass for storage and Kubernetes administrator to visualize how Pure Service Orchestrator, the CSI driver provided by Pure Storage, is utilising storage. One of the features of PSOX is its ability to identify orphaned volumes from a Kubernetes cluster.
Persistent Volume Granularity
There are a lot of options available when it comes to how the pod can access the persistent storage volume and these are controlled by Kubernetes. These different options are normally defined with a storageClass.
The most common of these is the accessMode which controls how the data in the PV can be accessed and modified. There are three modes available in Kubernetes:
- ReadWriteMany (RWX) – the volume can be mounted as read-write by many nodes
- ReadWriteOnce (RWO) – the volume can be mounted as read-write by a single node
- ReadOnlyMany (ROX) – the volume can be mounted read-only by many nodes
Additional controls for the underlying storage volume can be provided through the storageClass include mount options, volume expansion, binding mode which is usually used in conjunction with storage topology (also managed through the storageClass).
A storageClass can also apply specific, non-standard, granularity for different features a CSI driver can support.
In the case of Pure Service Orchestrator, all of the above-mentioned options are available to an administrator creating storage classes, plus a number of the non-standard features.
Here is an example of a storageClass definition configured to use Pure Service Orchestrator as the CSI provisioner:
apiVersion: storage.k8s.io/v1
kind: StorageClass
metadata:
  name: example
provisioner: pure-csi
parameters:
  iops_limit: "30000"
  bandwidth_limit: "10G"
  backend: block
  csi.storage.k8s.io/fstype: xfs
  createoptions: -q
mountOptions:
  - discard
allowedTopologies:
  - matchLabelExpressions:
      - key: topology.purestorage.com/rack
        values:
          - rack-0
          - rack-1
allowedVolumeExpansion: true
This might look a little complex, but simplistically this example ensures that PersistentVolumes created through this storageClass will have the following attributes:
- Quality of Service limits of 10Gb/s bandwidth and 30k IOPs
- Volumes are capable of being expended in size
- One first use by a pod the volume will be formatted with the xfs filesystem and mounted with the discard flag
- The volume will only be created by an underlying FlashArray found in either rack-0 or rack-1 (based on labels defined in the PSO configuration file)
Pure Service Orchestrator even allows the parameters setting to control the NFS ExportRules of PersistentVolumes created on a FlashBlade.
Check back for Part 3 of this series, where I’ll discuss the latest developments in ephemeral storage in Kubernetes.
Ephemeral or Persistent? The Storage Choices for Containers (Part 1)
In this series of posts, I’ll cover the difference between ephemeral and persistent storage as far as Kubernetes containers are concerned and discuss the latest developments in ephemeral storage. I’ll also occasionally mention Pure Service Orchestrator™ to show how this can provide storage to your applications do matter what type is required.
Back in the mists of time when Kubernetes and containers, in general, were young storage was only ephemeral. There was no concept of persistency for your storage and the applications running in container environments were inherently ephemeral themselves and therefore there was no need for data persistency.
Initially, with the development of FlexDriver plugins and lately CSI compliant drivers, persistent storage has become a mainstream offering to enable applications that need or require state for their data. Persistent storage will be covered in the second blog in this series.
Ephemeral Storage
Ephemeral storage can come from several different locations, the most popular and simplest being emptyDir. This is, as the name implies, an empty directory mounted in the container that can be accessed by one or more pods in the container. When the container terminates, whether that be cleanly or through a failure event, the mounted emptyDir storage is erased and all its contents are lost forever.
emptyDir
You might wonder where this “storage” used by emptyDir comes from and that is a great question. It can come from one of two places. The most common is actually from the actual physical storage available to the Kubernetes nodes running the container, usually from the root partition. This space is finite and completely dependent on the available free capacity of the disk partition the directory is present on. This partition is also used for lots of other dynamic data, such as container logs, image layers, and container-writable layers, so it is potentially an ever-decreasing resource.
To create this type of ephemeral storage for a pod(s) running in a container, ensure the pod specification has the following section:
 volumes:
  - name: demo-volume
    emptyDir: {}
Note that the {} states that we are not providing any further requirements for the ephemeral volume. The name parameter is required so that pods can mount the emptyDir volume, like this:
   volumeMounts:
    - mountPath: /demo
      name: demo-volume
If multiple pods are running in the container they can all access the same emptyDir if they mount the same volume name.
From the pods perspective, the emptyDir is a real filesystem mapped to the root partition, which is already part utilised, so you will see it in a df command, executed in the pod, as follows (this example has the pod running on a Red Hat CoreOS worker node):
# df -h /demo
Filesystem                Size      Used Available Use% Mounted on
/dev/mapper/coreos-luks-root-nocrypt
                        119.5G     28.3G     91.2G  24% /demo
If you want to limit the size of your ephemeral storage this can be achieved by adding resource limits to the container in the pod as follows:
      requests:
        ephemeral-storage: "2Gi"
      limits:
        ephemeral-storage: "4Gi"
Here the container has requested 2GiB of local ephemeral storage, but the container has a limit of 4GiB of local ephemeral storage.
Note that if you use this method and you exceed the ephemeral-storage limits value the Kubernetes eviction manager will evict the pod, so this is a very aggressive space limit enforcement method.
emptyDir from RAM
There might be instances that you only need a minimal scratch space area for your emptyDir and you don’t want to use any of the root partition. In this case, resources permitting, you can create this in RAM. The only difference in the creation of the emptyDir is that more information is passed during its creation in the pod specification as follows:
 volumes:
  - name: demo-volume
    emptyDir:
      medium: Memory
In this case, the default size of the mounted directory is half of the RAM the running node has and is mounted on tmpfs. For example, here the worker node has just under 32GB of RAM and therefore the emptyDir is 15.7GB, about half:
# df -h /demo
Filesystem                Size      Used Available Use% Mounted on
tmpfs                    15.7G         0     15.7G   0% /demo
You can use the concept of sizeLimit for the RAM-based emptyDir but this does not work as you would expect (at the time of writing). In this case, the sizeLimit is used by the Kubernetes eviction manager to evict any pods that exceed the sizeLimit specified in the emptyDir.
Check back for Part 2 of this series, where I’ll discuss persistent storage in Kubernetes.
Pure Service Orchestrator 6 is now GA!
Simon covers the details here:
https://blog.purestorage.com/pure-service-orchestrator-6-0/
Now if you used any of the old versions of PSO you know it can smart provision across Pure Storage arrays with a single storageClass for block and one for file. Today I am proud to share the mysterious and sometimes confusing third storageClass pure is no longer installed with PSO 6. The long story is that storage class was to support legacy systems that use the 1.0 version of our driver. There has been 2.5 years to get used to pure-block. So now with the upgrade you can make the right choice.
jowings@asgard ~/pso-values k get sc
NAME PROVISIONER RECLAIMPOLICY VOLUMEBINDINGMODE ALLOWVOLUMEEXPANSION AGE
pure-block pure-csi Delete Immediate true 56s
pure-file pure-csi Delete Immediate true 56sNow you have only two obvious choices.
Hey, Don’t break EBS

TL;DR – EBS Volumes fail to mount when multipathd is installed on EKS worker nodes.

AWS Elastic Kubernetes Service is a great way to dive in with managed Kubernetes in the cloud. Pure Service Orchestrator integrates EKS worker nodes into the Cloud Block Store on AWS. I created this ansible playbook to make sure the right packages and services are started on my worker nodes.
---
- hosts: all
  become: yes
  tasks:
  - name:    Install prerequisites
    yum:
      name: ['iscsi-initiator-utils', 'device-mapper-multipath']
      update_cache: yes
  - name:    Create directories
    file:
      path: "{{ item }}"
      state: directory
      mode: 0755
    with_items:
      - /etc/multipath
  - name: Copy file with owner and permissions
    copy:
      src: ./multipath.conf
      dest: /etc/multipath.conf
      owner: root
      group: root
      mode: '0644'
  - name: REstart iscsid
    service:
      name: iscsid
      state: restarted
  - name: REstart multipathd
    service:
      name: multipathd
      state: restarted
In my previous testing with PSO and EKS I was basically focused on using PSO only. Recently the use case of migrating from EBS to CBS has shown to be pretty valuable to our customers in the cloud. To create the demo I used an app I often use for demoing PSO. It is 2 Web server containers attached to a mySQL container with a persistent volume. Very easy. I noticed though as I was using the built in gp2 Storage Class it started behaving super odd after I installed PSO. I installed the AWS EBS CSI driver. Same thing. It could not mount volumes or snapshot them in EBS. PSO volumes on CBS worked just fine. I figure most customers don’t want me to break EBS.
After digging around the internet and random old Github issues there was no one thing seemingly having the same issue. People were having problems that had like 1 of the 4 symptoms. I decided to test when in my process it broke after I enabled the package device-mapper-multipath. So it wasn’t PSO as much as a very important pre-requisite to PSO causing the issue. What it came down to is the EBS volumes were getting grabbed by multipathd and the Storage Class didn’t know how to handle the different device names. So I had to find how to use multipathd for just the Pure volumes. The right settings in multipath.conf solved this. This is what I used as an example:
blacklist {
    device {
        vendor "*"
    }
}
blacklist_exceptions {
    device {
        vendor "PURE"
        product "*"
    }
}
I am telling multipathd to ignore everything BUT Pure. This solved my issue. So I saved this into the local directory and added the section in the ansible playbook to copy that file to each worker node in EKS.
1. Copy the ansible playbook above to a file prereqs.yaml
2. Copy the above multipath blacklist settings to multipath.conf and save to the same directory as prereqs.yaml
3. Run the ansible playbook as shown below. (make sure the inventory.ini has IP’s and you have the SSH key to login to each worker node.
# Make sure inventory.ini has the ssh IP's of each node.
# prereqs.yaml includes the content from above

ansible-playbook -i inventory.ini -b -v prereqs.yaml -u ec2-user
This will install the packages, copy multipath.conf to /etc and restart the services to make sure they pick up the new config.
Py-bot in a Container
So during Pure kickoff last week I did several sessions on Pure Storage and Kubernetes for our yearly Tech Summit. It was very fun to prepare for. I wanted to do something different and I decided to take my py-bot I was running on my raspberry pi and up-level with integration into K8s and the FlashBlade with PVC’s. This is the second post and covers how to build the docker container and deploy to k8s.

Check out the repo on github: https://github.com/2vcps/python-twitter-bot
Take a look at the code in ./bots
- autoreply.py – code to reply to mentions
- config.py – sets the API connection
- followFollowers_data.py – Follows anyone that follows you, then writes some of their recent tweets to a CSV on a pure-file FlashBlade filesystem
- followFollowers.py – All the followback with no data collection
- tweetgamescore.py – future
- tweetgamesetup.py – future
Py-bot In Kubernetes
Prereqs
- python3
- twitter account with API keys
- Pure Service Orchestrator and working Kubernetes How to install Pure Service Orchestator CSI Plugin
Step 1
Build the docker image and push to your own repo. Make sure you are authenticated to your internal repo.
$ docker build -t yourrepo/you/py-bot:v1 .
$ docker push yourrepo/you/py-bot:v1
Step 2
Create a secret in your k8s environment with the keys are variables. Side note: this is the only methond I found to not break the keys when storing in K8s. If you have a functioning way to do it better let me know.
edit env-secret.yaml with your keys from twitter and the search terms.
kubectl apply -f env-secret.yaml
Verify the keys are in your cluster.
kuebctl describe secret twitter-api-secret
Step 3
Edit deployment.yaml and deploy the app. In my example I have 3 different deployments and one pvc. If you play to not capture data make sure to change the followback deployment to launch followFollowers.py and not followFollowers_data.py. Addiotionally, remove the PVC information if you are not using it.
Be sure to change the image for each deployemnt to your local repository path.
Notice that the autoreply deployment uses the env variable searchkey2 and favretweet deployment will use searchkey1. This allows each app to seach on different terms.
Be careful, if you are testing the favretweet.py program and use a common word for search you will see many many likes and retweets.
Now deploy
kubectl apply -f deployment.yaml

kubectl get pod

NAME                          READY   STATUS    RESTARTS   AGE
autoreply-df85944d5-b9gs9     1/1     Running   0          47h
favretweet-7758fb86c7-56b9q   1/1     Running   0          47h
followback-75bd88dbd8-hqmlr   1/1     Running   0          47h

kubectl logs favretweet-7758fb86c7-56b9q

INFO:root:API created
INFO:root:Processing tweet id 1229439090803847168
INFO:root:Favoriting and RT tweet Day off. No pure service orchestrator today. Close slack Jon, do it now.
INFO:root:Processing tweet id 1229439112966311936
INFO:root:Processing tweet id 1229855750702424066
INFO:root:Favoriting and RT tweet In Pittsburgh. Taking about... Pure Service Orchestrator. No surprise there.  #PSO #PureStorage
INFO:root:Processing tweet id 1229855772789460992
INFO:root:Processing tweet id 1230121679881371648
INFO:root:Favoriting and RT tweet I nearly never repost press releases, but until I can blog on it.  @PureStorage and Pure Service Orchestrator join… https://t.co/A6wxvFUUY7
INFO:root:Processing tweet id 1230121702509531137

kuebctl logs followback-75bd88dbd8-hqmlr

INFO:root:Waiting... 300s
INFO:root:Retrieving and following followers
INFO:root:purelyDB
INFO:root:PreetamZare
INFO:root:josephbreynolds
INFO:root:PureBob
INFO:root:MercerRowe
INFO:root:will_weeams
INFO:root:JeanCarlos237
INFO:root:dataemilyw
INFO:root:8arkz
More info
Migrate Persistent Data into PKS with Pure vVols
While I discussed in my VMworld session this week some of the architectural decisions to be made while deploying PKS on vSphere my demo revolved around once it is up and running how to move existing data into PKS.
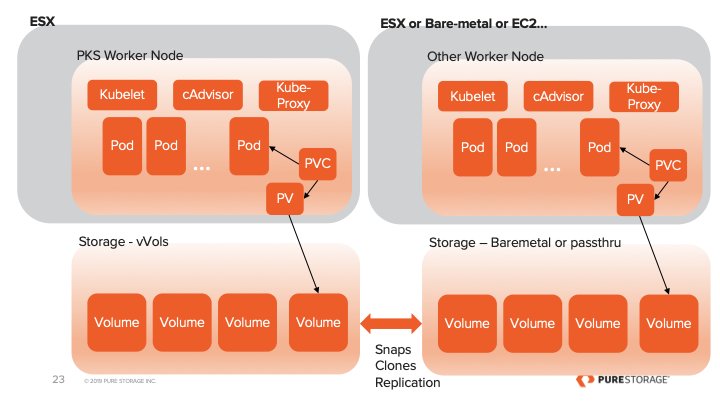
First, using the Pure FlashArray and vVols we are able to automate that process and quickly move data from another k8s cluster into PKS. It is not limited to that but this is the use case I started with.
Part 1 of the demo shows taking the persistent data from a deployment on and cloning it over the vVol that is created by using the vSphere Cloud Provider with PKS. vVols are particularly important because they keep the data in a native format and make copy/replication and snapshotting much easier.
Part 2 is the same process just scripted using Python and Ansible.
Demo Part 1 – Manual process of migrating data into PKS
Demo Part 2 – Using Python and Ansible to migrate data into PKS
The code I used is available from code.purestorage.com. Which also links to the GitHub repo https://github.com/PureStorage-OpenConnect/k8s4vvols
Use PKS Enterprise on VMware SDDC and Pure Storage
Use PKS Enterprise on VMware SDDC and Pure Storage
Pivotal Container Services (PKS) provides a deeply integrated Kubernetes (k8s) architecture for the VMware SDDC. It is a joint engineering project from VMware and Pivotal. In my conversations with Pure Storage customers or potential customers around Kubernetes I often get asked about how Pure Storage can help a PKS Enterprise environment. The good news is there is a very easy path to utilizing k8s with Pure + VMware + PKS.
The Architecture
Using Pure with PKS is actually very straight forward. Since Pure FlashArray is already leading choice for all VMware environments it is not anything out of the ordinary to support PKS.
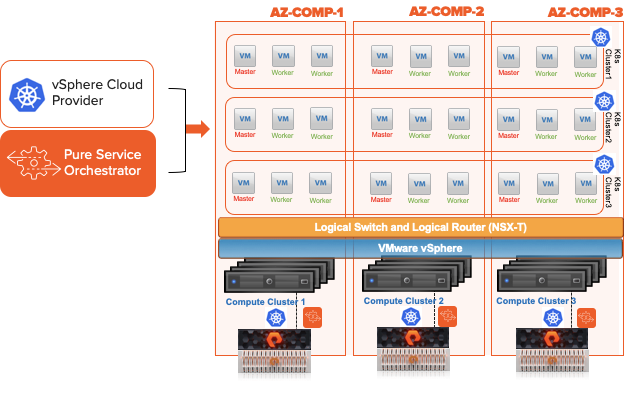
Understanding the underlying technology that integrates PKS into VMware you may soon realize that highly reliable, stateless and shared storage is the best choice when deploying PKS.
The choice between drivers (shown in the graphic above) to deliver the Storage is up to you. The vSphere Cloud Provider provides automated creation and management of the virtual disks presented to containers in PKS. This supports the use of vVols and enables great possibilities for your PKS environment. Pure Service Orchestrator utilizes a direct connection to Pure Storage FlashArrays, FlashBlades and Cloud Block Stores. It is installed with a single Helm command or Kubernetes Operator. It includes Smart Provisioning in order to place volumes on the most optimal storage device in your fleet.
The choice of which tool will be dictated by your workload. It is not an exclusive choice either. It is easy to do both. After VMworld I hope to publish the details on how to install PSO on PKS. If you have really good github search foo you may be able to find the bosh deployment.
Highly Reliable
Pure Storage has measured 6×9’s of uptime across its customer base. Many storage solutions for container environments will require hours of planning and weeks of proper implementation to provide high availability. Do not spend time re-architecting your storage infrastructure for PKS. Spend your time delivering k8s to your customers so they can deliver innovation for your business. Use the Pure Storage devices you already have. You may not even need a whole new dedicated array (don’t tell sales I said that).
Stateless Arrays for Stateful Data
Migrating data should be eliminated from your daily tasks. As FlashArrays move further into the future where data always stays in place. The ability to keep the data in place for multiple hardware generations is a proven benefit of Pure. Migrating persistent storage in k8s even on VMware is a non-trivial task. Depending on your scale this could take weeks of planning and careful flawless execution to accomplish non-disruptively. The underlying hardware should not be a concern for delivering applications. Pure Storage has made this a reality since the FlashArray debut 7 years ago.
Shared Storage
Delivering highly reliable data across multiple PKS and vSphere clusters, allowing applications to failover if the compute in an availability zone becomes unavailable, is key to delivering a cloud experience for your k8s rollout. While the Pure sales teams would gladly help you acquire a FlashArray per vSphere cluster hosting PKS this is simply un-needed for nearly all situations. Especially as you start on your Kubernetes journey.
But Why PURE?
Simple; vVols on the FlashArray combined with the PKS integration with vSphere enables mobility of data and freedom unavailable on a legacy datastore. Have a group that rolled their own k8s? FlashArray can clone their persistent data instantly into PKS using vVols. Need to copy data from a bare metal (non-VM) k8s cluster to PKS? Pure vVols makes this possible. Have multiple k8s clusters within PKS today that require the same data for test/dev/prod Pure Storage enables this nearly instantly. Pure Storage FlashArray Snapshots and Clones move at the speed of an API call from any of our SDK’s from Python to Powershell to Ansible to Terraform and more to give you an easy way to fit Pure Storage into your Infrastructure as Code tools.
You can probably spend the next 5 hours reading blogs and papers of all the other benefits of Pure Storage and they all apply to your PKS on vSphere environment but I wanted to provide a few examples directly related to operating PKS on Pure.
VMworld 2019 Session
In my session for VMworld in San Francisco I will demonstrate how Pure Storage is able to instantly migrate persistent volumes from “other” k8s clusters to PKS. Make sure you make it to this session if you considering PKS.