Py-bot in a Container

So during Pure kickoff last week I did several sessions on Pure Storage and Kubernetes for our yearly Tech Summit. It was very fun to prepare for. I wanted to do something different and I decided to take my py-bot I was running on my raspberry pi and up-level with integration into K8s and the FlashBlade with PVC’s. This is the second post and covers how to build the docker container and deploy to k8s.

Image result for twitter
tweet tweet

Check out the repo on github: https://github.com/2vcps/python-twitter-bot

Take a look at the code in ./bots

  • autoreply.py – code to reply to mentions
  • config.py – sets the API connection
  • followFollowers_data.py – Follows anyone that follows you, then writes some of their recent tweets to a CSV on a pure-file FlashBlade filesystem
  • followFollowers.py – All the followback with no data collection
  • tweetgamescore.py – future
  • tweetgamesetup.py – future

Py-bot In Kubernetes

Prereqs

Step 1

Build the docker image and push to your own repo. Make sure you are authenticated to your internal repo.

$ docker build -t yourrepo/you/py-bot:v1 .
$ docker push yourrepo/you/py-bot:v1

Step 2

Create a secret in your k8s environment with the keys are variables. Side note: this is the only methond I found to not break the keys when storing in K8s. If you have a functioning way to do it better let me know.

edit env-secret.yaml with your keys from twitter and the search terms.

kubectl apply -f env-secret.yaml

Verify the keys are in your cluster.

kuebctl describe secret twitter-api-secret

Step 3

Edit deployment.yaml and deploy the app. In my example I have 3 different deployments and one pvc. If you play to not capture data make sure to change the followback deployment to launch followFollowers.py and not followFollowers_data.py. Addiotionally, remove the PVC information if you are not using it.

Be sure to change the image for each deployemnt to your local repository path.
Notice that the autoreply deployment uses the env variable searchkey2 and favretweet deployment will use searchkey1. This allows each app to seach on different terms.

Be careful, if you are testing the favretweet.py program and use a common word for search you will see many many likes and retweets.

Now deploy

kubectl apply -f deployment.yaml

kubectl get pod

NAME                          READY   STATUS    RESTARTS   AGE
autoreply-df85944d5-b9gs9     1/1     Running   0          47h
favretweet-7758fb86c7-56b9q   1/1     Running   0          47h
followback-75bd88dbd8-hqmlr   1/1     Running   0          47h

kubectl logs favretweet-7758fb86c7-56b9q

INFO:root:API created
INFO:root:Processing tweet id 1229439090803847168
INFO:root:Favoriting and RT tweet Day off. No pure service orchestrator today. Close slack Jon, do it now.
INFO:root:Processing tweet id 1229439112966311936
INFO:root:Processing tweet id 1229855750702424066
INFO:root:Favoriting and RT tweet In Pittsburgh. Taking about... Pure Service Orchestrator. No surprise there.  #PSO #PureStorage
INFO:root:Processing tweet id 1229855772789460992
INFO:root:Processing tweet id 1230121679881371648
INFO:root:Favoriting and RT tweet I nearly never repost press releases, but until I can blog on it.  @PureStorage and Pure Service Orchestrator join… https://t.co/A6wxvFUUY7
INFO:root:Processing tweet id 1230121702509531137

kuebctl logs followback-75bd88dbd8-hqmlr

INFO:root:Waiting... 300s
INFO:root:Retrieving and following followers
INFO:root:purelyDB
INFO:root:PreetamZare
INFO:root:josephbreynolds
INFO:root:PureBob
INFO:root:MercerRowe
INFO:root:will_weeams
INFO:root:JeanCarlos237
INFO:root:dataemilyw
INFO:root:8arkz

More info

My Blog 2vcps.io

Follow me @jon_2vcps

Migrate Persistent Data into PKS with Pure vVols

While I discussed in my VMworld session this week some of the architectural decisions to be made while deploying PKS on vSphere my demo revolved around once it is up and running how to move existing data into PKS.

First, using the Pure FlashArray and vVols we are able to automate that process and quickly move data from another k8s cluster into PKS. It is not limited to that but this is the use case I started with.

Part 1 of the demo shows taking the persistent data from a deployment on and cloning it over the vVol that is created by using the vSphere Cloud Provider with PKS. vVols are particularly important because they keep the data in a native format and make copy/replication and snapshotting much easier.

Part 2 is the same process just scripted using Python and Ansible.

Demo Part 1 – Manual process of migrating data into PKS

Demo Part 2 – Using Python and Ansible to migrate data into PKS

How to automate the Migration with some Python and Ansible

The code I used is available from code.purestorage.com. Which also links to the GitHub repo https://github.com/PureStorage-OpenConnect/k8s4vvols

They let me on a stage. Again. 🙂

Creating a Helm Repo with Github

Next step in learning helm is being able to take an existing helm package and put it in your own repo.

There are ways to do this with github pages. I don’t really want mess withthat right now, how can I use a Github repo to host my changes to the deployment?

For installing helm and an additional demo please see part 1 of this series.

http://54.88.246.86/2018/03/27/getting-started-with-helm-for-k8s/

Continue reading “Creating a Helm Repo with Github”

Getting Started with Helm for K8s

Over the last few weeks I was setting up Kubernetes in the lab. One thing I quickly learned was managing and editing yaml files for deployments, services and persistent volume claims became confusing and hard. Even when I had things commited in github sometimes I would make edits then not push them then rebuild my K8s cluster.

The last straw was when 2 of our Pure developers said that editing yaml in vi wasn’t very cool and to start using helm.

Needless to say that was good advice. I still have to remember to push my repos to github. Now my demostration applications are more “cloud native”. I can create and edit them in one environment and use helm install in another and have it just work.

Continue reading “Getting Started with Helm for K8s”

Using Snapshots with the Pure Storage Plugin for Kubernetes

One request from customers is not only provision persistent storage for Kubernetes but also integrate into workflows that may need to snap and copy the data for different environments. Much like we do this with powershell or python for SQL and Oracle environments to accelerate development or QA. Pure has enabled snapshots using the Pure Provisioner as part of our Kubernetes Plugin.

In this demo I am showing how I can take a users data directory for JupyterHub and clone it for another user to take advantage of all the benefits of Pure’s snapshots and clones. You instantly get access to a copy of the dataset. The dataset doesn’t take up room on the backend storage. Only globally unique changes will grow the volume. In this use case the Data Science team will see increases in productivity as they are not waiting for data to download from the cloud or copy from another place on the array.

The command to run the snap using kubectl is below:

kubectl exec <pure provisioner pod name> -- snapshot create -n <namespace> <pvc-claim-name>

Kubernetes and the Pure Storage FlexVolume Plugin

First, if you are using Pure Storage and Kubernetes make life easier and take a look at our plugin. Now version 1.2.2 and GA.

https://hub.docker.com/r/purestorage/k8s/

Make sure the follow the directions on the page to pull and install the plugin. If you are using Openshift pay special attention to the Readme. I will post more on this in the near future.

Cockroach DB as our Persistent Database

I want to simulate a very easy database that I can easily use in a container. That is also not the same old. I built a Go app that will write to a database over and over to kind of demonstrate the inner workings of the plugin but not necessarily supply a performance test.

To learn more about the steps I use in the video to deploy and manage CRDB in K8s please check out this link. https://www.cockroachlabs.com/docs/stable/orchestrate-cockroachdb-with-kubernetes.html

With that said, please check out how to deploy and scale a database with a persistent data platform from a Pure FlashArray. Watch this in Full screen to make the CLI commands easier to see.

What you are seeing in the video:

  1. Deploy the initial 3 pods with volumes automatically created and connected on the Pure FA.
  2. Initialize the cluster.
  3. Fail a node and watch K8s redeploy a new container and re-attach the data volume.
  4. Run a load generation application as a K8s Job.
  5. Scale the DB cluster out to 8 nodes.

What is next?

This is a really easy and quick demo but it show the ease of using the Pure Plugin to manage the persistent data, making sure you do not lose data in the event of app crashes. Also easily scaling. This can all be done via policy and the deployment can be made even easier using Helm. In a future post we will see how we can take advantage of these methods and keep the same highly available, high performance and very easy to use persistent data platform for your application.

Four Resources that Got Me Started with Kuberenetes

In the last post I mentioned there are resources that have already gone through that do a better job than me in helping you understand containers and Kubernetes.
So if you are a virtualization admin like me and want to make 2018 the year you know enough to be dangerous I suggest the following resources.

  1. Do Nigel Poulton’s Docker Deep Dive. A foundational understanding to containers will help the orchestration parts make sense.https://app.pluralsight.com/library/
  2. Read Nigel’s The Kubernetes Book
  3. Do Kubernetes the Hard Way. Once you see this the options that make K8s easier will seem a lot cooler and you will understand what they do in the background.
  4. Go and Play with Docker and Kubernetes. Free sandboxes for you to try out.
    https://labs.play-with-docker.com/
    https://labs.play-with-k8s.com/

Start thinking: Does this app need a VM or a container? Once you are asking the question you will begin to think critically about the choices.

I am not sure we all need to move 100% off of VM’s today. Starting to ask the questions will help prepare us to provide these services to our customers when the workloads and workflows that require them to arise.

Anaconda with Jupyter Notebooks on Kubernetes

WARNING: YAML Heavy post. Sorry.

So I have been internally debating the best way to share this latest little thing I was working on/ learning. My goal over 2018 is to post more on migrating applications from virtual to containers managed by K8s. That transition isn’t for everything and has definetley required diving more into applications. There are many Kubernetes concepts I am going to skip over as others may already have explained them better.  I do plan on doing a vSphere to K8s quick and easy to help us VCP’s and other Virtual Admins get started.

OK, getting started. Define some concepts

Anaconda, Conda for short.

Conda is a python package and environment manager for Data Science.  You can download Anaconda here:
https://www.anaconda.com/download/

I wanted to keep it running in my lab and even though it works just fine on my local laptop, I switch between PC and Mac (2 of them) and wanted my environment (and data) available from a central place. Plus, I can’t learn Kubernetes without real applications to run.

Jupyter

Jupyter is an open source web application that allows you to display interactive code, equations and visualizations. I use it for Data Analytics in Python.

http://jupyter.org/

So jupyter is an application that can run in your conda environment. I want to run it as a container with persistent NFS storage in my Kuberenetes cluster in my basement. Notebooks are the files that contain the code and visualizations. I can post notebooks to github to allow others to test my work. In the github repo, I included a very basic file with some python. Once you have this all running you can play with it if you would like.

So how to get it to run. ContinuumIO the keepers of Anaconda provide a container image and some basic instructions for running the container on Docker.  I googled for ways that people provide this in cluster environment. In the near future Jupyterhub will be the solution for you if you want multi-tenant jupyter deployments with Oauth and all kinds of fancy features I do not need in my tiny lab.

The following files are all available on my github at Conda-K8s. This worked in my environment with Kuberenetes 1.9. Your mileage may vary depending on access rights, version and anything you do that I don’t know about.

First create the persistent volume you will need to create and edit the following nfs-pv.yaml file.

nfs-pv.yaml

apiVersion: v1
kind: PersistentVolume
metadata:
  name: conda-notebooks
spec:
  capacity:
    storage: 100Gi
  accessModes:
    - ReadWriteMany
  nfs:
    # FIXME: use the right IP and the right path
    server: 192.168.x.x
    path: "/nfs/repos/yourvalidpath"

First make sure you edit the file with your NFS server IP and valid already created path to your NFS Share. This is where your jupyter notebook data will be stored. If the POD crashes or the host server dies it will start elsewhere in the cluster, your data will persist. Brilliant!

via GIPHY

IF you want an automated way to create, mount and manage these volumes with Pure Storage check our our awesome flexvolume plugin for Kubernetes.  Right now we will focus on making it work with any NFS path. This is manual and slow, so if you are serious about analytics get the plugin, and a FlashBlade.

$kubectl create -f nfs-pv.yaml

Then to view if your volume is ready run:

$kubectl get pv

Output for my system

NAME                                 CAPACITY   ACCESS MODES   RECLAIM POLICY   STATUS     CLAIM                                        STORAGECLASS   REASON    AGE
claim-jowings                        10Gi       RWX            Retain           Released   jupyter4me/hub-db-dir                                                 3d
conda-notebooks                      100Gi      RWX            Retain           Bound      default/conda-claim                                                   3d

Now that the volume object is created we can now create the “claim”
I am not going to get into the why of doing this but as far as my tiny brain can understand it is the way K8s manages what application can connect with what persistent volume.  Notice how the request section of the yaml is asking for 100Gi, the size of my volume in the last step.

nfs-pvc.yaml.

apiVersion: v1
kind: PersistentVolumeClaim
metadata:
  name: conda-claim
spec:
  accessModes:
    - ReadWriteMany
  storageClassName: ""
  resources:
    requests:
      storage: 100Gi
kubectl create -f nfs-pvc.yaml

To view the results

kubectl get pvc

Finally we can create the POD. The pod is what kubernetes uses to schedule a application and its most basic component. It can be just one container. It can be more, for now we won’t get into what all that means.

conda-pod.yaml

kind: Pod
apiVersion: v1
metadata:
  generateName: conda-
  labels:
    app: conda
spec:
  volumes:
    - name: conda-volume
      persistentVolumeClaim:
       claimName: conda-claim
  containers:
    - name: conda
      image: continuumio/anaconda3
      env:
      - name: JUPYTERCMD
        value: "/opt/conda/bin/conda install jupyter nb_conda -y --quiet && /opt/conda/bin/jupyter notebook --notebook-dir=/opt/notebooks --ip='*' --port=8888 --no-browser --allow-root"
      command: ["bash"]
      args: ["-c","$(JUPYTERCMD)"]
      ports:
        - containerPort: 8888
          name: "http-server"
      volumeMounts:
        - mountPath: "/opt/notebooks"
          name: conda-volume

If you take a look at the file above there are some things we are doing to get conda and jupyter to work. First notice the “env” section I created. I didn’t want to create a custom container image but rather use the default image provided by continuumio. I don’t want to accidentally become reliant on my own proprietary image. Without the command and the arguments in the $JUYPTERCMD environment variable, the container starts, has nothing to do, and shuts down. K8s sees this as a failure so it starts it again (and again and again). Also we see in the volumes section we are telling the POD to use our “conda-claim” we created in the last step. Under containers the volumeMounts declaration tells k8s to mount the pv to the mountPath inside the container.

kubectl create -f conda-pod.yaml

Now lets see what the results look like:

kubectl get pod
NAME                                     READY     STATUS    RESTARTS   AGE
conda-742lc                              1/1       Running   0          2d

Very good, the pod is running and we have a “READY 1/1”

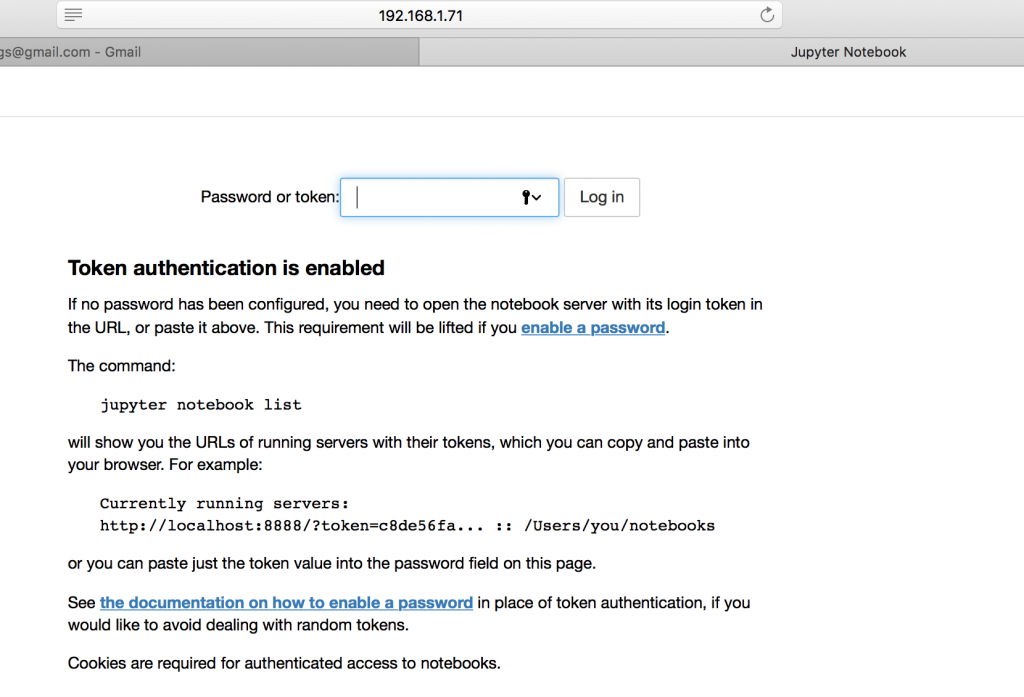
A few things we need to connect to the jupyter notebook. Run the following command and notice the output. It gives you a URL with a token to access the web app. Obviously localhost is going to not work from my remote workstations. Save that token for later though.

$kubectl logs conda-742lc


Package plan for installation in environment /opt/conda:

The following NEW packages will be INSTALLED:

    _nb_ext_conf:     0.4.0-py36_1         
    nb_anacondacloud: 1.4.0-py36_0         
    nb_conda:         2.2.1-py36h8118bb2_0 
    nb_conda_kernels: 2.1.0-py36_0         
    nbpresent:        3.0.2-py36h5f95a39_1 

The following packages will be UPDATED:

    anaconda:         5.0.1-py36hd30a520_1  --> custom-py36hbbc8b67_0
    conda:            4.3.30-py36h5d9f9f4_0 --> 4.4.7-py36_0         
    pycosat:          0.6.2-py36h1a0ea17_1  --> 0.6.3-py36h0a5515d_0 

+ /opt/conda/bin/jupyter-nbextension enable nbpresent --py --sys-prefix
Enabling notebook extension nbpresent/js/nbpresent.min...
      - Validating: OK
+ /opt/conda/bin/jupyter-serverextension enable nbpresent --py --sys-prefix
Enabling: nbpresent
- Writing config: /opt/conda/etc/jupyter
    - Validating...
      nbpresent  OK

+ /opt/conda/bin/jupyter-nbextension enable nb_conda --py --sys-prefix
Enabling notebook extension nb_conda/main...
      - Validating: OK
Enabling tree extension nb_conda/tree...
      - Validating: OK
+ /opt/conda/bin/jupyter-serverextension enable nb_conda --py --sys-prefix
Enabling: nb_conda
- Writing config: /opt/conda/etc/jupyter
    - Validating...
      nb_conda  OK

[I 17:09:25.393 NotebookApp] [nb_conda_kernels] enabled, 3 kernels found
[I 17:09:25.399 NotebookApp] Writing notebook server cookie secret to /root/.local/share/jupyter/runtime/notebook_cookie_secret
[W 17:09:25.421 NotebookApp] WARNING: The notebook server is listening on all IP addresses and not using encryption. This is not recommended.
[I 17:09:26.044 NotebookApp] [nb_anacondacloud] enabled
[I 17:09:26.050 NotebookApp] [nb_conda] enabled
[I 17:09:26.095 NotebookApp] ✓ nbpresent HTML export ENABLED
[W 17:09:26.095 NotebookApp] ✗ nbpresent PDF export DISABLED: No module named 'nbbrowserpdf'
[I 17:09:26.098 NotebookApp] Serving notebooks from local directory: /opt/notebooks
[I 17:09:26.098 NotebookApp] 0 active kernels 
[I 17:09:26.098 NotebookApp] The Jupyter Notebook is running at: http://[all ip addresses on your system]:8888/?token=08938eb3b2bc00f350c43f7535e38f6aa339f5915e12d912
[I 17:09:26.098 NotebookApp] Use Control-C to stop this server and shut down all kernels (twice to skip confirmation).
[C 17:09:26.099 NotebookApp] 
    
    Copy/paste this URL into your browser when you connect for the first time,
    to login with a token:
        http://localhost:8888/?token=08938<blah blah blah

We must create a “service” in Kubernetes in order for the application to be accessible. There is a ton about services and ingress into applications. Since I am running on an private cluster. Not on Google or Amazon I am going to use the simplest way for this post to create external access. That is done using the “type” under the spec. See how it says NodePort?  Also I am not specifying an inbound port (you can do that if you want). I am just telling it to find the app called “conda” and forward traffic to tcp 8888.

conda-svc.yaml

kind: Service
apiVersion: v1
metadata:
  name: conda-svc
spec:
  type: NodePort
  ports:
    - port: 8888
  selector:
    app: conda
kubectl create -f conda-svc.yaml

This creates the service from the file. This is actually a cool concept that allows the inbound traffic management (ingress) be disaggregated from the application pod/deployment. That means I can swap versions of the app without changing the inbound rules or loadbalancers (lb is a whole book unto itself). To see my services now I run:

$ kubectl get svc
NAME                              TYPE        CLUSTER-IP       EXTERNAL-IP   PORT(S)           AGE
conda-svc                         NodePort    10.98.67.191     <none>        8888:32250/TCP    2d
kubernetes                        ClusterIP   10.96.0.1        <none>        443/TCP           36d
mc-nash-minecraft                 NodePort    10.105.112.153   <none>        25565:31642/TCP   31d
mc-shea-minecraft                 NodePort    10.111.206.174   <none>        25565:31048/TCP   31d
mc-survival-minecraft             NodePort    10.99.46.7       <none>        25565:31723/TCP   31d
prom-2vcps-prometheus-server-np   NodePort    10.104.173.0     <none>        80:31400/TCP      30d

Great, now we see the service is forwarding port 32250 (yours will be different) to 8888. Using the node port type I can actually hit any node in my cluster and my K8s CNI will forward the traffic.

now just go to and paste your token from earlier.

http://<a node ip>:32250/

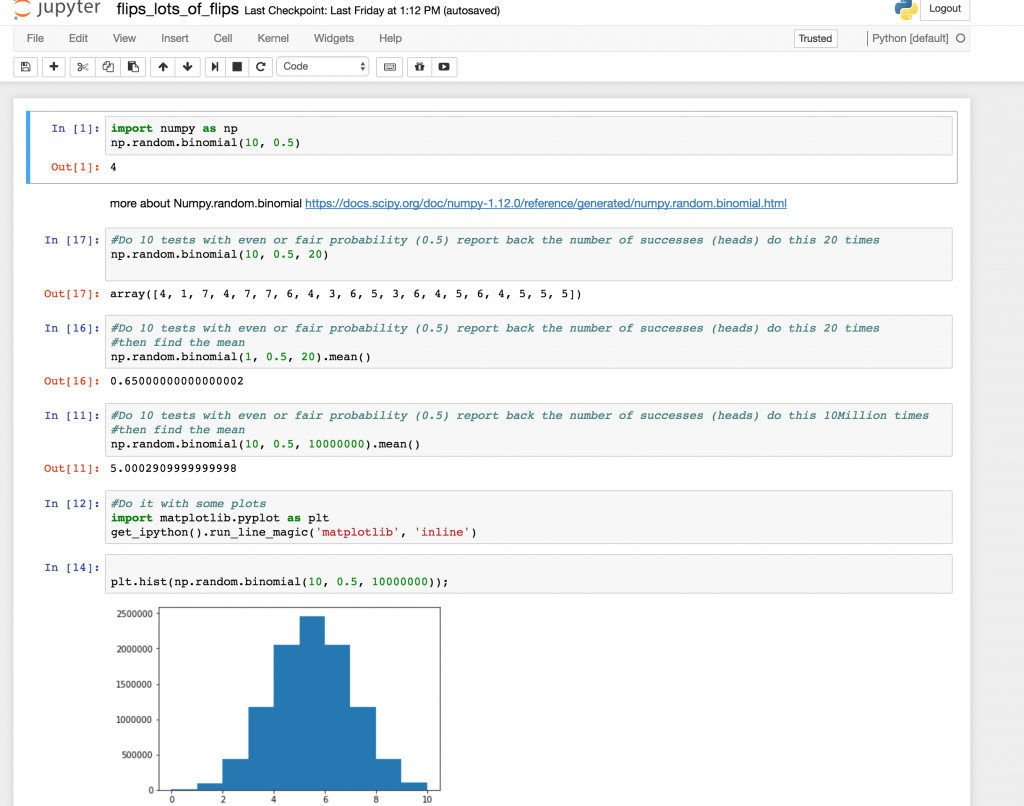
In my github repo for this project I included a basic notebook file that shows some python code to simulate coin flips many many times. Feel free to “upload” and play with it and have fun with Data Science on Juypter / Conda running in a K8s cluster.