This is the third part of the blogs I have been writing to document building a Python based twitter bot and running it in a container and deploying it to Kubernetes. The first post was about building the python, the second was all about building the docker container and using a deployment in Kubernetes. This last part pulls it all together and lets Github, Jenkins and Kubernetes do the work for you.
Getting Started
Pre-requisites:
- Working Kubernetes Cluster
- Working Container Registry and your Kubernetes cluster is able to pull images from it.
- Jenkins and a service account Jenkins can use to do things in K8s.
Jenkinsfile
Go ahead and fork my repo https://github.com/2vcps/python-twitter-bot to your own github account.
Now looking at the Jenkinsfile below inside of the repo. Some things for your to modify for your environment.
- Create a serviceAccount to match the serviceAccountName field in the yaml. This is the permissions the pod building and deploying the bot will use to run during the process. If you get this wrong. There will be errors.
- make the the images in the file all exist in your private registry. The first image tag you see is used to run kubectl and kustomize. I suggest building this image from the cloud builders public repo. The docker file is here:
https://github.com/GoogleCloudPlatform/cloud-builders-community/tree/master/kustomize
The second image used is public kaniko image. Now using that specific build is the only way it will function inside of a container. Kaniko is a standalone tool to build container images. Does not require root access to the docker engine like a ‘docker build’ command does. Also notice there is a harbor-config volume that allows kaniko to push to my harbor registry. Please create the secret necessary for your container registry.
Also notice the kubectl portion is commented out and is only left behind for reference. The Kustomize image contains both kubetctl and kustomize commands. - Last thing to take note of is the commands kustomize uses to create a new deployment.yaml called builddeploy.yaml. This way we can build and tag the container image each time and the deployements will be updated with the new tag. We avoid using “latest” as that can cause issues and is not best practice.
podTemplate(yaml: """
kind: Pod
spec:
  serviceAccountName: jenkins-k8s
  containers:
  - name: kustomize
    image: yourregistry/you/kustomize:3.4
    command:
    - cat
    tty: true
    env:
    - name: IMAGE_TAG
      value: ${BUILD_NUMBER}
  - name: kubectl
    image: gcr.io/cloud-builders/kubectl
    command:
    - cat
    tty: true
    env:
    - name: IMAGE_TAG
      value: ${BUILD_NUMBER}
  - name: kaniko
    image: gcr.io/kaniko-project/executor:debug-539ddefcae3fd6b411a95982a830d987f4214251
    imagePullPolicy: Always
    command:
    - /busybox/cat
    tty: true
    env:
    - name: DOCKER_CONFIG
      value: /root/.docker/
    - name: IMAGE_TAG
      value: ${BUILD_NUMBER}
    volumeMounts:
      - name: harbor-config
        mountPath: /root/.docker
  volumes:
    - name: harbor-config
      configMap:
        name: harbor-config
"""
  ) {

  node(POD_LABEL) {
    def myRepo = checkout scm
    def gitCommit = myRepo.GIT_COMMIT
    def gitBranch = myRepo.GIT_BRANCH
    stage('Build with Kaniko') {
      container('kaniko') {
        sh '/kaniko/executor -f `pwd`/Dockerfile -c `pwd` --skip-tls-verify --destination=yourregistry/you/py-bot:latest --destination=yourregistry/you/py-bot:v$BUILD_NUMBER'
      }
    }
    stage('Deploy and Kustomize') {
      container('kustomize') {
        sh "kubectl -n ${JOB_NAME} get pod"
        sh "kustomize edit set image yourregistry/you/py-bot:v${BUILD_NUMBER}"
        sh "kustomize build > builddeploy.yaml"
        sh "kubectl get ns ${JOB_NAME} || kubectl create ns ${JOB_NAME}"
        sh "kubectl -n ${JOB_NAME} apply -f builddeploy.yaml"
        sh "kubectl -n ${JOB_NAME} get pod"
      }
    }
    // stage('Deploy with kubectl') {
    //   container('kubectl') {
    //     // sh "kubectl -n ${JOB_NAME} get pod"
    //     // sh "kustomize version"
    //     sh "kubectl get ns ${JOB_NAME} || kubectl create ns ${JOB_NAME}"
    //     sh "kubectl -n ${JOB_NAME} apply -f deployment.yaml"
    //     sh "kubectl -n ${JOB_NAME} get pod"
    //   }
    // }
  }
}
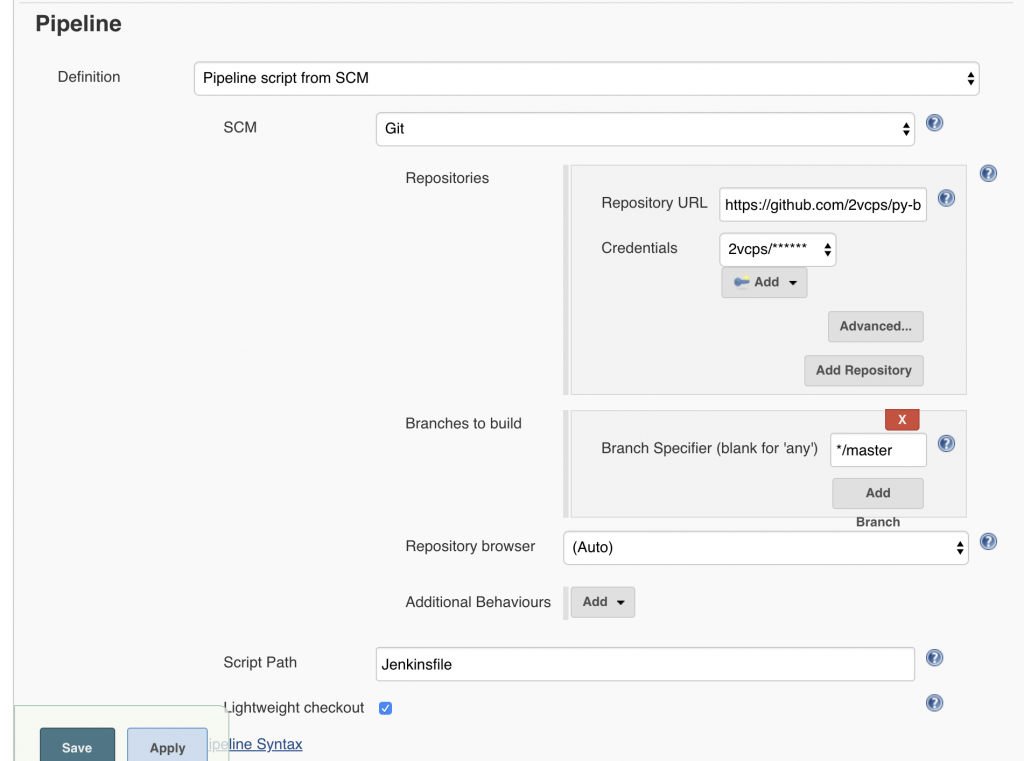
Create a jenkins pipeline and name it however you like, the important part is to set the Pipeline section to “Pipleline script from SCM”. This way Jenkins knows to use the Jenkinsfile in the git repository.
Webhooks and Build Now
Webhooks are what Github uses to push a new build to Jenkins. Due to the constraints of my environment I am not able to do this. My Jenkins instance cannot be contacted by the public API of Github. For now I have to click “Build Now” manually. I do suggest in a fully automated scenario investigating how to configure webhooks so that on every commit you can trigger a new pipeline build.
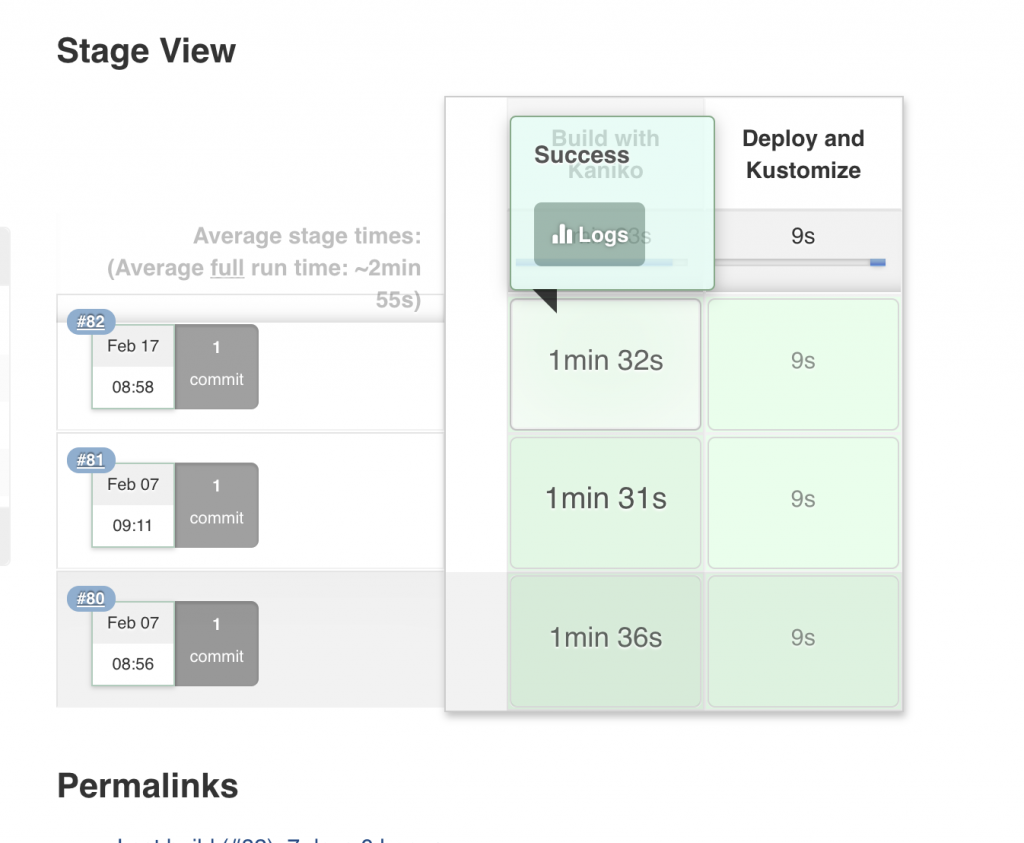
What the build is successful you should see some lovely green stages like below. In this example there are only 2 stages. Build with Kaniko, this builds the container image and pushes to my internal repo (Harbor). Then Deploy and Kustomize, which takes the new image and updates the 3 deployments in my Kubernetes cluster.
Output from Kubectl:
